

Virtualization provides an expansive list of advantages including easy migration, rational consumption of resources, scalability, etc. For this reason, companies that have physical servers often want to convert at least some of them to virtual machines. Hyper-V is a hardware virtualization platform provided by Microsoft. Today’s blog post explains which servers should be converted and tools that can be used for converting physical machines to Hyper-V virtual machines. Read to decide which tool best suits your needs.
General P2V Conversion Features and Recommendations
The conversion of a physical computer to a virtual machine is also known as P2V conversion. Let’s take a look at when physical computers shouldn’t be converted, what issues may occur, and how to avoid possible issues.
Physical computers that should not be converted
Domain controller that is running on a physical server. It is better to create a new VM, install the Windows Server OS (operating system), deploy a Domain Controller (DC) Role, synchronize a new DC with your main DC, demote your old main DC, remove the old DC from Active Directory (AD) Site & Services, and, finally, remove the old domain controller. Repeat the DC migration once more if you need to use the host name and IP address that were also used by a physical server with a domain controller (because two servers cannot use the same name and IP address at once). Converting a physical server on which a DC is currently running to a VM can cause troubles.
Exchange Server running on a physical server. As with domain controllers, it is recommended that you add a new virtual server to Exchange infrastructure and then remove the physical server after successful migration. P2V conversion of Exchange servers may slow down performance, corrupt a database, or cause other issues.
Systems installed on special hardware. The examples of such systems can be Solaris machines with SPARC architecture, macOS servers with PowerPC architecture, etc.
Possible issues
P2V conversion may cause some issues. Let’s explore some common issues and why they might occur.
BSOD (OS cannot load). Physical servers usually have disk drives connected to RAID controllers. If you connect a disk with the operating system to a machine with another disk controller, drivers for which are not installed on that machine, the OS will not be able to boot properly (VMs use emulated disk controllers that are distinct from most hardware disk controllers). In this case BSOD (blue screen of death) can be shown for Windows OS. Seeing BSOD 0x0000007B means that the OS is failing to boot due to a missing driver of a disk controller in the system.
Licensing/activation issues. Some companies use algorithms based on special hardware identifiers (signatures) for generating license keys for their software. In this case a license can be used for software installed on a specific hardware device. If you change some hardware components, for example, the motherboard (to another motherboard with a different chipset) then the software may require a license or activation once more. Virtual machines use emulated hardware that differs considerably from physical hardware. Thus, you may need to re-activate the software product after P2V conversion. Converting physical machines with OEM (Original Equipment Manufacturers) licensed software can cause licensing/activation issues.
Recommendations to avoid issues
Back up data from your physical machine. Make a full backup of disks used by the operating system as well as back up all needed files before further preparing a physical server for conversion. For example, if you accidentally remove a vitally important driver that ensures the OS is able to load, then you can restore your OS to a working state from a backup.
Remove unnecessary drivers. Remove drivers for devices that will not be used by a VM. This approach allows us to reduce the likelihood of critical errors that result in BSOD. Be careful with the drivers of a disk controller – removing them can make your system unloadable.
Pre-install Hyper-V Integration Services. Hyper-V Integration Services is a set of drivers and applications used for proper work of VMs. Install Integration Services on the OS before performing P2V migration. If it is not possible to install Integrated Services on a physical machine, convert a physical machine to a virtual machine. If your VM cannot load, power off the VM, mount your VHD (VHDX) virtual disk to your Windows system, and use PowerShell to install Integration Services into a mounted VHD (VHDX).
Finally, keep in mind some tips:
- Don’t run a physical machine and a virtual machine (created by converting a physical server) with enabled networking simultaneously as this can result in network conflicts.
- Delete unused files and uninstall unused programs from your physical machine before conversion. You can save disk space and time spent on conversion.
- Test performance of a VM after conversion. Remove a physical server only when you have ensured that the performance of the VM is enough for you.
Tools for Converting a Physical Machine to a Hyper-V VM
The two most popular free tools for converting a physical machine to a Hyper-V VM are Microsoft Virtual Machine Converter (MVMC) and Disk2VHD.
Microsoft Virtual Machine Converter
MVMC (Microsoft Virtual Machine Converter) is developed by Microsoft and used to convert the entire physical machine or VMware virtual machine including all disks to a Hyper-V VM. Be aware that MVMC converts each partition to a single virtual disk. If the hard disk drive of a physical server has 4 partitions, then MVMC will create 4 separate virtual disk files of a VHD format (converting to VHDX files is not supported). Hence, the hidden 100MB or 350MB partitions that are automatically created during installation of new Windows versions (Windows 7 or later) will be converted as separate virtual disks.

MVMC must be installed on a destination machine (Hyper-V host) or on a third-party Windows machine (called a broker in this case). A temporary directory with enough space is required even if you run the converter on a destination Hyper-V host. Don’t install MVMC on a physical machine that will be converted to a VM. Partitions from physical disks are converted to dynamic VHD disks (by default), hence, you should prepare free space on your Hyper-V host based on space used on a physical server that has been converted.
Microsoft provides a graphical user interface (GUI) and a command line interface (CLI) via PowerShell for Microsoft Virtual Machine Converter. Using GUI is convenient and using a PowerShell module allows for scripting to convert machines in bulk.
Only machines with Windows operating systems can be converted. The officially supported versions are Windows Server 2008 and Windows Server 2012. Of course, you can try to convert Windows Server 2016 and other Windows versions. Linux and other operating systems such as FreeBSD, Solaris etc. are not supported. .NET Framework and BITS (Background Intelligent Transfer Service) Compact Server are required on a machine where you install MVMC.
Disk2VHD
Disk2VHD is a free conversion tool developed by Sysinternals that was acquired by Microsoft. This tool can convert physical disks to virtual disks, but cannot convert the entire virtual machine. Notice that the OS running on a physical server may not be prepared for running in virtual environment by Disk2VHD before converting disks. If a physical disk consists of multiple partitions, these partitions will be created on a single dynamic VHD or VHDX virtual disk (unlike partitions converted by MVMC). You can select particular disk partitions for conversion. A target virtual disk file must not be located on the volume that is converted. Disk volumes encrypted by Bitlocker cannot be converted.
Disk2VHD is a standalone lightweight portable application – you don’t need to install it, just run an EXE file on Windows machine. Disk2VHD must be executed on a physical server whose disks you want to convert for importing to a virtual machine. The concept is the following – you must convert disks, then create a new VM, and attach the virtual disks (VHD or VHDX files) to this new VM. As Disk2VHD is executed on a running server, stop all possible services, especially database-related services to ensure data consistency and application consistency of the disk image that you will have as a result. The Use Volume Shadow Copy Service option is available in Disk2VHD, but using this option may not have an impact on some running applications.
Disk2VHD can be executed on Windows Vista, Windows Server 2008, and newer Windows systems (32-bit and 64-bit). There are no editions for Linux and other operating systems. This conversion tool can be run in GUI mode and in command line mode. Command line options included in the application allow you to create scripts for converting physical disks to virtual disks.
Converting P2V with MVMC
Download the virtual machine converter from the Microsoft site and install the application. Installation is straightforward and was explained previously in the blog post focused on converting VMware VMs to Hyper-V VMs. Make sure that the BITS Compact Server is installed on a Hyper-V host that is a destination server.
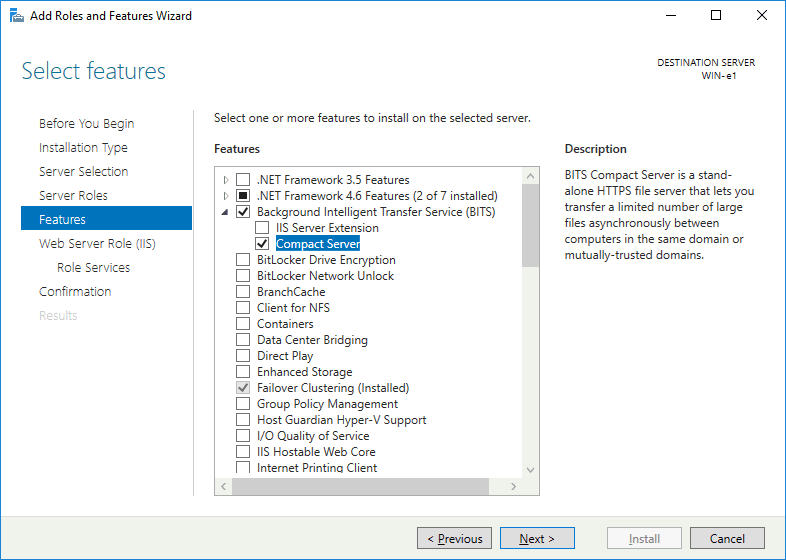
On a destination host (the host on which MVMC is installed) go to Control Panel > Programs and Features > Turn Windows Features on or off > Add Features and ensure that a BITS Compact Server feature is enabled.
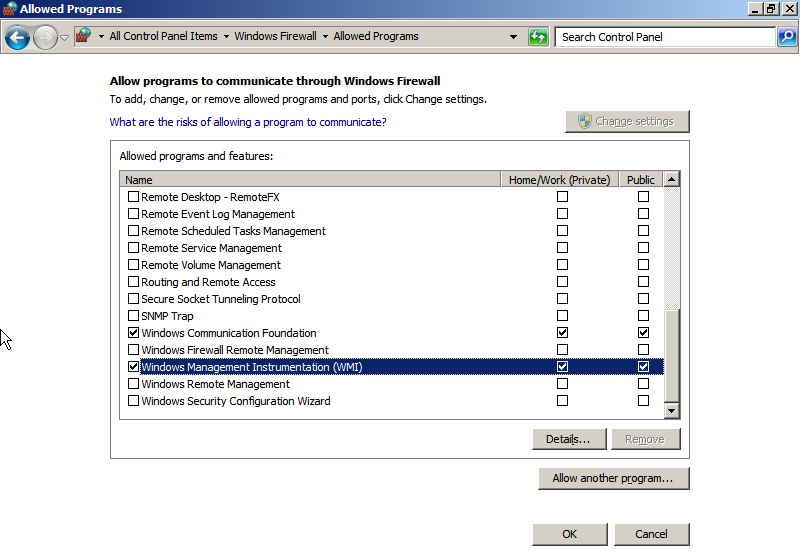
Don’t forget to check your firewall settings to prevent connection issues. Windows Management Instrumentation (WMI) must be in a list of allowed programs to communicate over the network.
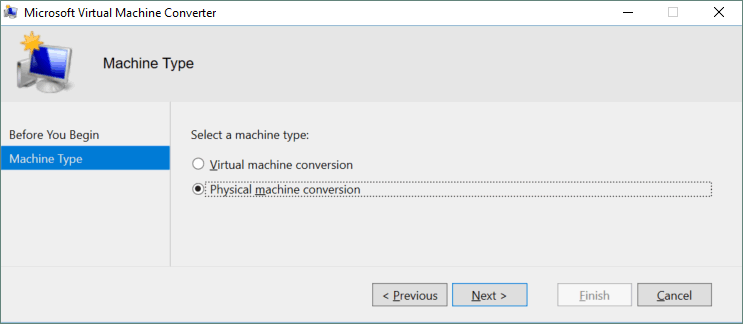
There are two machines in this example – a physical server that must be converted and a Hyper-V server that is a destination server on which the virtual machine that you will have as a result can be run. Run the Microsoft Virtual Machine Converter on the destination server and select Physical machine conversion. Click Next.
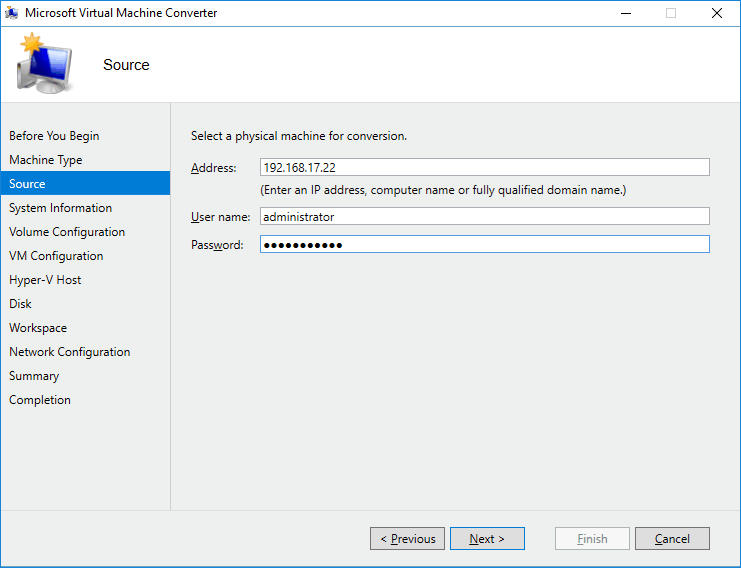
Select a physical machine for conversion (enter an IP address, computer name or fully qualified domain name) and enter credentials (with administrative rights) to access that machine. Click Next.
Note: The error “The RPC Server is unavailable” may occur on this step. Check the firewall settings – connections of Windows Management Instrumentation (WMI) must be allowed as shown above.
You have specified the credentials and now you can scan a system to gather system information for temporary installation of a tiny agent on the source machine. Click the Scan System button, wait until the scanning process is complete and then click Next.
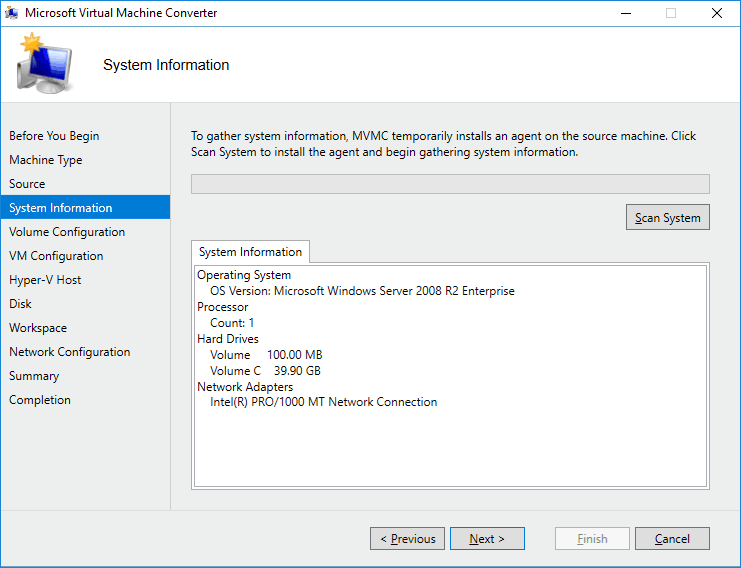
Select volumes to include in the conversion. There are two volumes on the one disk in this example. The first 100MB volume (System reserved) was created by default during Windows installation and is used for booting the operating system. Don’t forget to select this volume. You can also choose the provisioning type of VHD virtual disk – Dynamic or Fixed. A separate VHD file is created for each selected volume. Click Next to continue.

Set the VM Configuration. Specify the name, the number of processors, and the amount of memory for the new VM. Click Next.

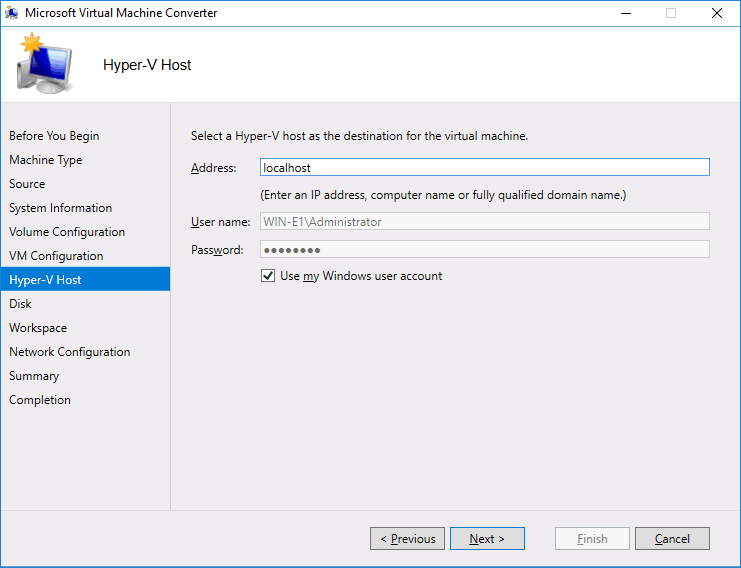
Select a Hyper-V host as the destination for the virtual machine. Notice that you cannot select a host as the destination server if a Hyper-V role is not enabled on that server. You can enter localhost as the destination server address if you select a Hyper-V host as the destination server. If you use a broker, then enter the name or the IP address of the destination Hyper-V server instead of localhost. Enter the credentials of an administrative account in order to access a Hyper-V server, or check the box Use my Windows user account if your account has adequate privileges and MVMC is running on a destination Hyper-V host. Click Next to continue.
Note: You may encounter the error “The RPC Server is unavailable” at this step if you use a broker where MVMC is running and the machine with Microsoft Virtual Machine Converter cannot access the destination Hyper-V host via Remote Procedure Call. Try the following:
- Make sure that RPC services are running properly. Run services.msc and check the services with the following names: DCOM Server Process Launcher, Remote Procedure Call (RPC), RPC Endpoint Mapper.
- Enable Remote Assistance in Windows Firewall to allow the application to communicate over the network.
- Check whether File and Printer Sharing is enabled in the network settings.
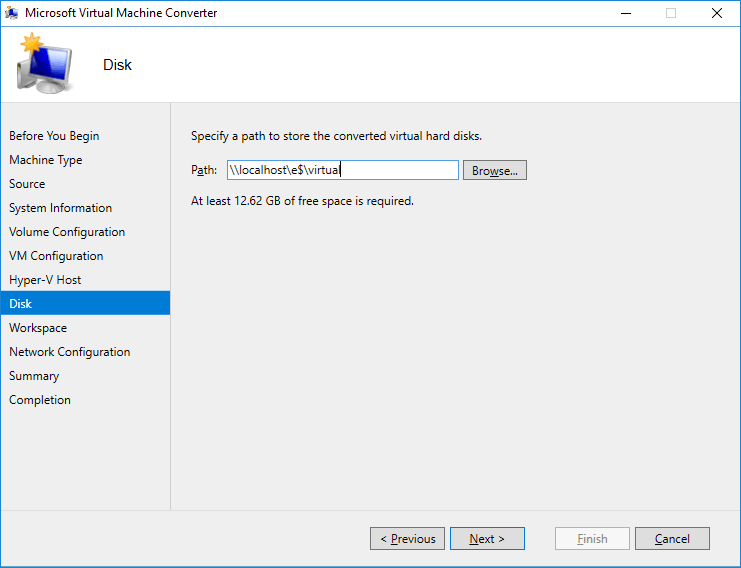
Specify a network path to store the converted virtual disks. Let’s store the virtual disks on E:\virtual. As in this example, MVMC and Hyper-V server are running on the same machine, the path is \\localhost\e$\virtual. Click Next.
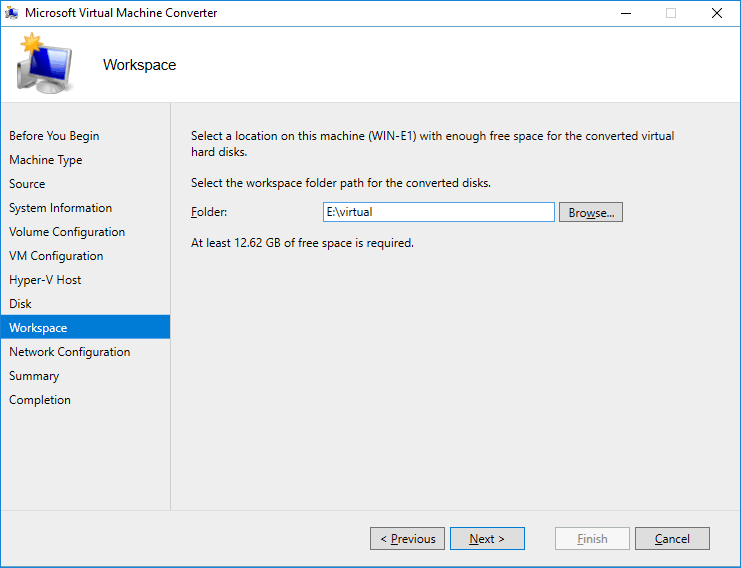
Select a temporary location on the machine where the virtual machine converter is running, for example E:\virtual. If you run MVMC on the destination Hyper-V host, you can use the same directory as you have specified in the previous step for storing virtual disk files. After finishing the conversion, these temporary files will be deleted.
Select the virtual switch for each virtual network adapter to be connected to a network. Don’t forget to shut down the source physical machine (or disconnect from the network) before starting a destination virtual machine to prevent network conflicts. You can also select the Not connected option and then manually configure network connection for the VM after conversion.

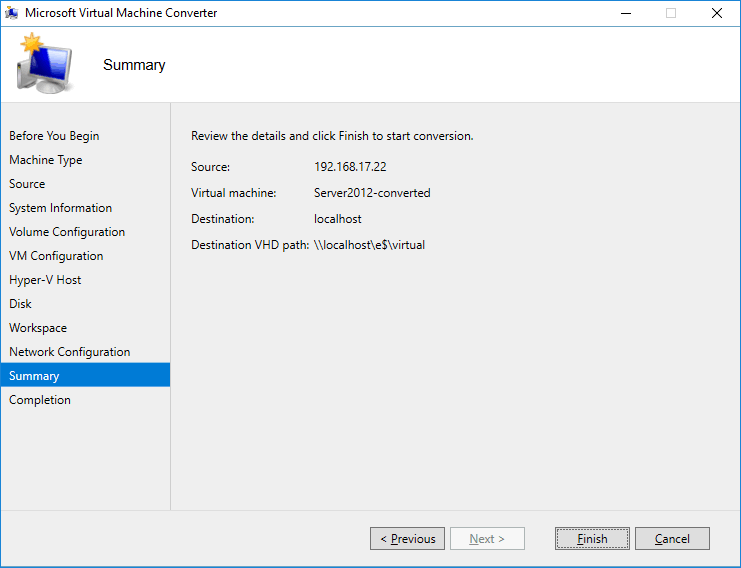
Review the details you have specified and click Finish to start conversion.
Wait until conversion is finished.
Note: If you get an error “The namespace \\comp_name\root\microsoft\bits doesn’t exist on the server comp_name” then verify whether BITS Compact Server is installed on the destination server.
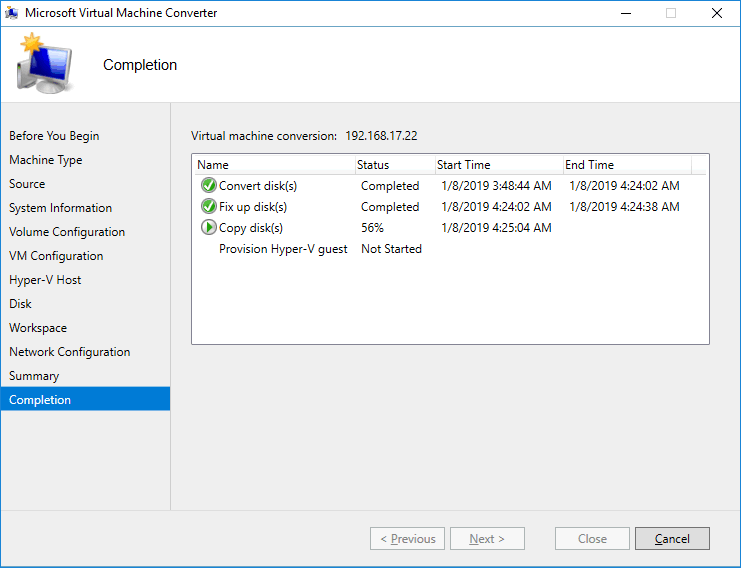
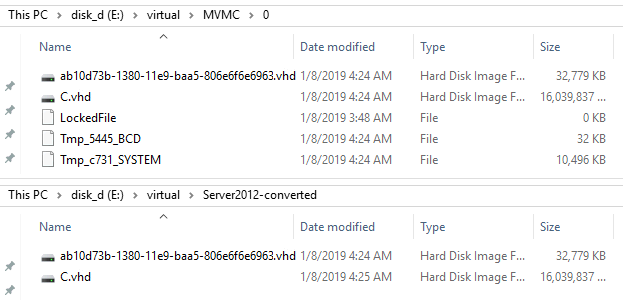
During the Convert disk(s) stage, volumes on physical disks are converted to virtual disks. These converted virtual disks are stored in the temporary directory you have specified. A subdirectory /MVMC/0 (1,2,3 etc.) is created in that directory. On the Copy disk stage, created files are copied from the temporary directory (in this example E:\virtual\MVMC\0) to the destination directory (E:\virtual\Server2012-converted in this case) that you have specified as the network path. This approach is useful when you use a broker. If you don’t use a broker, as in this example, and the destination Hyper-V server and MVMC are running on the same computer, then this approach is not practical as it causes you to waste time waiting around while copying files from a temporary directory to a destination directory. On the screenshot below, you can see that the VHD files in both directories are the same.
When the conversion process is complete, your VM will be present in the Hyper-V Manager. You can check the VM settings and run the VM. Be aware that after conversion, VM memory is configured as fixed. If you want to use dynamic memory and VLAN tagging, you should configure these settings manually.
Converting P2V with Disk2VHD
Download Disk2VHD from Microsoft’s site by using this link. Extract the disk2vhd.exe file from a zip archive you have downloaded. Copy the disk2vhd.exe file to a physical machine whose disks you want to convert and then run Disk2VHD. You can also find the Disk2vhd.chm file that includes a compact user manual.
The interface of the application is simple and user-friendly. Check the boxes next to the disk volumes you want to convert. Enter the destination path to store virtual disk files. In this example, a network SMB (CIFS) share mapped as a disk S: is used. You can also use an external USB HDD. Don’t use a partition to be converted as the destination location for VHD (VHDX) files. Unlike MVMC, Disk2VHD supports the more progressive VHDX format of Hyper-V virtual disks. Check the Use Vhdx box. Check the Use Volume Shadow Copy box to prevent data and transaction inconsistencies, due to a source machine running during conversion. Manually stop all services that can be stopped and then click the Create button to start the conversion process.
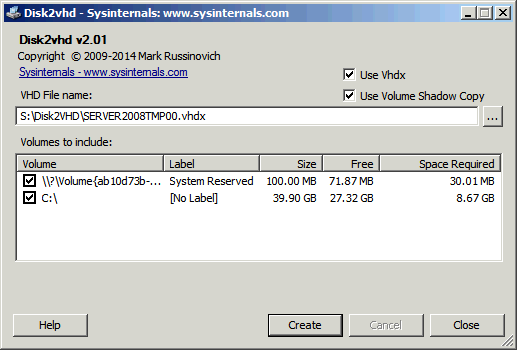
Wait until the conversion is finished. Disk2VHD can convert all volumes of the same physical disk to a single VHD or VHDX file. In the current example, the same physical machine (with two volumes on a physical disk) that was converted with MVMC in the previous example is being converted.
![]()
Importing the converted disks to a VM
Now you should manually create a new VM on a Hyper-V server and import the virtual disks created by the Disk2VHD utility to the VM. Creating a new VM is explained in the blog post about creating new Hyper-V VMs and in the blog post about cross-platform recovery. Select Generation 1 for your VM if the source physical machine had been running in the BIOS mode. If the source machine worked in the UEFI mode, you can choose Generation 2. The amount of virtual memory should not be less than that on the physical server, but you can use Dynamic Memory. In the Network section, you can select the virtual switch for network connection. You can use a virtual switch in a bridged mode if you don’t want to reconfigure the VM network settings as well as network settings and application configuration of related machines.
The crucial point is connecting virtual disks. In the Connect Virtual Hard Disk section, select the Use an existing virtual hard disk option. If you have multiple virtual disk files, you can add them later in the VM settings after creating the new VM (Right click the VM, click Settings, select the disk controller, select the hard drive, click the Add button, and select the virtual disk file).

When the creation of the new VM is finished, you can power on the VM. The operating system will detect new devices and will ask you to reboot. You should install Hyper-V Integration Services on the VM.
Conclusion
There are two methods available for converting physical machines to Hyper-V virtual machines – with the help of Microsoft Virtual Machine Converter and with Disk2VHD. Both utilities can be used for Windows systems only.
Using Microsoft Virtual Machine Converter for converting physical machines is a good idea if the requirements are met and the OS on the source machine is in the list of supported operating systems. Configuring MVMC is not difficult, but is susceptible to errors. Only the VHD format of virtual disks is supported. One virtual disk file is created for each volume of the source physical disk; a temporary directory with an amount of free space equal to the used space on source disks is required for conversion. Despite the limitations, you have a virtual machine that is ready to work as a result.
Disk2VHD has a simpler interface with a lower number of options but you can use this tool for converting physical disks with operating systems that are not supported by MVMC. Disk2VHD supports the VHDX format of virtual disks while MVMC does not. You have to manually create a new VM and connect the virtual disks created after conversion to a virtual machine.
When you have converted a physical machine to a VM, you can discover the advantages of virtualization. Don’t forget to back up your VMs with the help of NAKIVO Backup & Replication!
Source : https://www.nakivo.com/blog/convert-physical-machine-hyper-v-vm/

")