This Content Is Only For Subscribers
Please subscribe to unlock this content. Enter your email to get access.
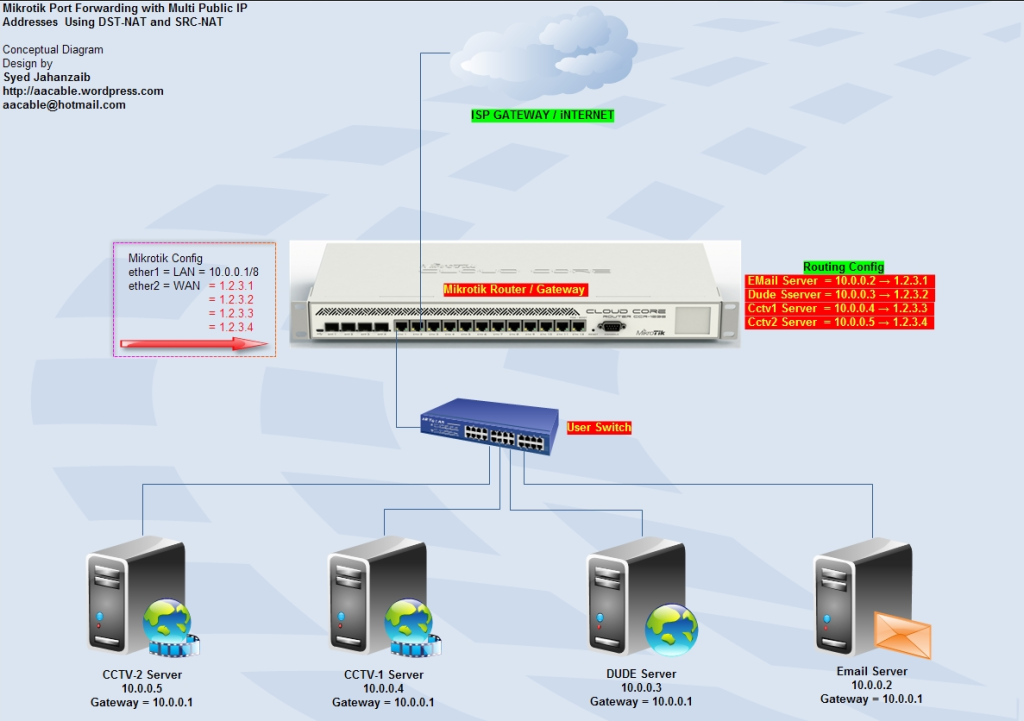
我們的場境如下圖,當我們的 WAN IP 有四個時, 1.2.3.1、1.2.3.2、1.2.3.3、1.2.3.4,另外要將不同的服務指向不同的伺服器如下:
Step One : 設定 Interfaces
設定 Mikrotik 兩個 Interfaces,一個作為 LAN Port,另一個作為 WAN Port,並設定地址:
ether1 = LAN users
ether2 = WAN Link
| 1 2 3 4 5 6 | /ip addressadd address=10.0.0.1/8 comment=LAN disabled=no interface=”LAN – ether1″ add address=1.2.3.1/29 interface=”WAN – ether2″ add address=1.2.3.2/29 interface=”WAN – ether2″ add address=1.2.3.3/29 interface=”WAN – ether2″ add address=1.2.3.4/29 interface=”WAN – ether2″ |
Step Two : 設定 Filter Rules
目標設定的 Port Forward 如下:
mail server = 10.0.0.2 → 1.2.3.1 WAN IP (Port 25,110,80)
dude server = 10.0.0.3 → 1.2.3.2 WAN IP (Port 80)
cctv1 server = 10.0.0.4 → 1.2.3.3 WAN IP (Port 81)
cctv2 server = 10.0.0.5 → 1.2.3.4 WAN IP (Port 82)
我們首先設定 Filter Rules,容許有關的 Incoming Traffic,並 DENY 所有其他不容許的數據流動。
| 1 2 3 4 5 6 7 8 9 10 | /ip firewall filter add action=accept chain=input comment=”SMTP” disabled=no dst-address=1.2.3.1 dst-port=25 in-interface=”WAN – ether2″ protocol=tcp add action=accept chain=input comment=”POP3″ disabled=no dst-address=1.2.3.1 dst-port=110 in-interface=”WAN – ether2″ protocol=tcp add action=accept chain=input comment=”Webmail” disabled=no dst-address=1.2.3.1 dst-port=80 in-interface=”WAN – ether2″ protocol=tcpadd action=accept chain=input comment=”DUDE” disabled=no dst-address=1.2.3.2 dst-port=80 in-interface=”WAN – ether2″ protocol=tcp add action=accept chain=input comment=”CCTV 1″ disabled=no dst-address=1.2.3.3 dst-port=81 in-interface=”WAN – ether2″ protocol=tcp add action=accept chain=input comment=”CCTV 2″ disabled=no dst-address=1.2.3.4 dst-port=82 in-interface=”WAN – ether2″ protocol=tcp add action=accept chain=input comment=”WINBOX 8192″ disabled=no dst-port=8192 in-interface=”WAN – ether2″ protocol=tcp add action=accept chain=input comment=”Allow PING ICMP ” disabled=no protocol=icmp add action=drop chain=input comment=”DROP ALL INCOMING TRAFFIC ON WAN INTERFACE” disabled=no in-interface=”WAN – ether2″ |
Step Three : 設定 NAT 及 Port Forwarding 的設定
目標設定的 Port Forward 如下:
| 1 2 3 4 5 6 7 8 9 10 11 12 | /ip firewall nat add action=dst-nat chain=dstnat comment=”SMTP 25 Forward to MAIL-Server” disabled=no dst-address=1.2.3.1 dst-port=25 in-interface=”WAN – ether2″ protocol=tcp to-addresses=10.0.0.2 to-ports=25 add action=dst-nat chain=dstnat comment=”POP3 110 Forward to MAIL-Server” disabled=no dst-address=1.2.3.1 dst-port=110 in-interface=”WAN – ether2″ protocol=tcp to-addresses=10.0.0.2 to-ports=110 add action=dst-nat chain=dstnat comment=”Web 80 Forward to MAIL-Server Webmail” disabled=no dst-address=1.2.3.1 dst-port=80 in-interface=”WAN – ether2″ protocol=tcp to-addresses=10.0.0.2 to-ports=80 add action=dst-nat chain=dstnat comment=”Web 80 Forward to DUDE” disabled=no dst-address=1.2.3.2 dst-port=80 in-interface=”WAN – ether2″ protocol=tcp to-addresses=10.0.0.3 to-ports=80 add action=dst-nat chain=dstnat comment=”CCTV1 – 81 Forward to cctv1″ disabled=no dst-address=1.2.3.3 dst-port=81 in-interface=”WAN – ether2″ protocol=tcp to-addresses=10.0.0.4 to-ports=81 add action=dst-nat chain=dstnat comment=”CCTV2 – 82 Forward to cctv2″ disabled=no dst-address=1.2.3.4 dst-port=82 in-interface=”WAN – ether2″ protocol=tcp to-addresses=10.0.0.5 to-ports=82 ### Now route specific local servers traffic from specific WAN IP address add action=src-nat chain=srcnat comment=”Rotue mail traffic via 1.2.3.1″ disabled=no src-address=10.0.0.2 to-addresses=1.2.3.1 add action=src-nat chain=srcnat comment=”Rotue DUDE traffic via 1.2.3.2″ disabled=no src-address=10.0.0.3 to-addresses=1.2.3.2 add action=src-nat chain=srcnat comment=”Rotue CCTV1 traffic via 1.2.3.3″ disabled=no src-address=10.0.0.4 to-addresses=1.2.3.3 add action=src-nat chain=srcnat comment=”Rotue CCTV2 traffic via 1.2.3.4″ disabled=no src-address=10.0.0.5 to-addresses=1.2.3.4 add action=masquerade chain=srcnat comment=”Default Masquerade Rule for LAN” disabled=no out-interface=”WAN – ether2″ src-address=10.0.0.2-10.0.0.255 |
Step Four : 設定 HAIRPIN NAT
| 1 2 3 4 5 | # DST-NAT rule to redirect port 3389 from /ip firewall natadd action=dst-nat chain=dstnat disabled=no dst-address=1.2.3.4 dst-address-type=local dst-port=3389 protocol=tcp to-addresses=192.168.1.10 to-ports=3389 comment=”Redirect RDP PORT TCP 3389 to local server” # Masquerade local traffic going to mikrotik WAN IP – [To access that service from LAN using mikrtoik wan ip] /ip firewall nat add chain=srcnat src-address=192.168.1.0/24 dst-address=192.168.1.10 protocol=tcp dst-port=3389 out-interface=LAN-Interface action=masquerade comment=”Masquerade Traffic going to WAN IP of mikrotik from local LAN users” |
Source : https://aacable.wordpress.com/2013/11/13/mikrotik-with-multiple-wan-ips-and-port-forwarding/